So, there may or may not have been an offer on the Stoff and Stil website which induced me to buy this pattern.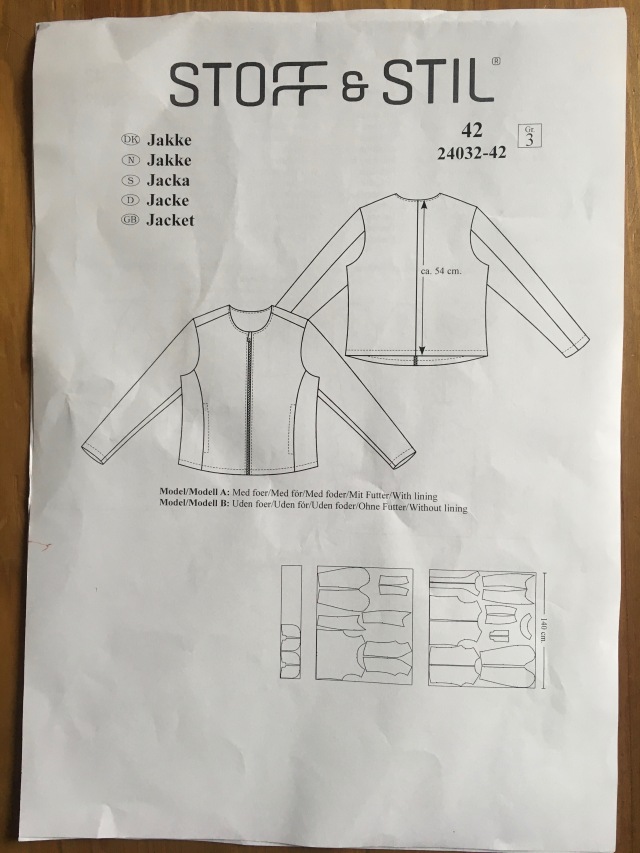
It looks like a simple straightforward boxy jacket right ? Well, look at that number in the top right hand corner (no I didn’t notice it either until it was too late) Gr 3, the website goes into more detail when you read it properly and says this is ‘expert’ level. Haha ! Well I’m nothing if not an optimist.
As with previous patterns I have had from Stoff and Stil the pattern pieces for the one size only are already cut out in the envelope, they were a bit creased so I thought a bit of light ironing before cutting out would be advisable. BIG MISTAKE, do not try and iron these pattern pieces, even on a low temperature, they just frizzle up and melt into nothingness……luckily I only ended up with a big hole in the middle of the sleeve, leaving me sufficient to pin onto the fabric for cutting.
The fabric I have used is one I bought a couple of years ago to make a skirt out of. I usually have some fabric next to the washing machine waiting to be washed prior to a sewing project and OH, trying to be helpful, put this one into the machine without consulting me. It has a high wool content and came out very stiff, rather felted and considerably smaller than it went in (1.5m down to 1.2m). Not at all suitable for the original skirt project and so it has languished in my stash for some time. I thought that the extra body it had acquired might work for the jacket.

I decided to use a Liberty silk that I bought ages ago on eBay for the lining as I am trying really hard to destash at the moment and not buy new. This is a really gorgeous fabric with viking ships on it,

The pattern instructions consist of one sheet of paper with instructions in 3 sections. The first section is for making the jacket shell, the second for making the lining and the third for attaching the two together and finishing off. There is also a page of diagrams numbered fig1-fig9
It all started off well and I constructed the pockets perfectly. I was really really pleased with them until I came to press them and realised that I had put the pocket bags on upside down.

So off they came and the pockets were reconstructed, unfortunately I haven’t QUITE achieved the perfect finish on the outside that I managed first time and I decided not to mess about with them too much more as the fabric was getting stretched.
I followed the instructions and diagrams until I got to fig6. Fig6 ? What happened to fig5 ? There is a diagram for something to do with attaching the facing but no corresponding instruction. What to do, should I follow the progression of diagrams or should I follow the instructions ? I read through all the remaining instructions and nowhere is there any instruction for attaching the facing although there are two facing pieces so I decided to follow the diagrams and attached the facing approximately where I thought it would be most logical in the steps. I did subsequently have to unpick a bit of it but overall I think I made the right decision.
I was pleasantly surprised to find that the shell actually seemed to fit straight away.
On to the lining. The second instruction is to make pleats in the front at the top and the bottom at the notches. Well my front pieces didn’t have any notches so I unpacked the pattern pieces to see if I had missed them off at the cutting out stage, nope, no notches. An proper expert jacket maker would have realised straight away, instead of after 20 minutes of investigation, that of course the instruction should refer to the BACK where there were indeed notches for pleats. Tsk tsk !
Then attaching the lining to the outer…well I made the same mistake with the sleeves as I did with my Schnittchen coat….Gaaah !! Cue unpicking and trusty Youtube.

Anyway I got there in the end and I love the inside of my jacket, in fact it could almost be worn inside out.

The jacket fits well and there is enough room to wear a jumper underneath. Being picky I think the stiffness of the outer fabric makes the sleeves look a bit chunky but I think this might soften out with wear. The zip is nicely even top and bottom and overall I’m very pleased with this effort. The front appears to dip down much more than in the diagram but I haven’t added anything to the pattern. This is definitely a wearable garment and was worth the effort of lining.

Am I an ‘expert’ ? Definitely not ! This make required far too much guesswork in interpreting the instructions revealing huge gaps in my knowledge. I need step by step instructions with preferably photos !

Well done for persevering! I certainly need my instructions to be a bit more detailed than that!!
LikeLike
Well done! Your fabric, especially the lining, is lovely. I’ve done the pocket thing before. I was so frustrated when I did it I considered just leaving it that way. Always the tantrum first – then the common sense and the unpicking and re-sewing. 🙂 I’m glad it turned out so well for you!
LikeLike